HOW DO I CHANGE USER PERMISSIONS

Each SignStix user is assigned a ‘role’, and each role contains a number of ‘permissions’.

The Permissions

The permissions and their meanings in the system are as follows:

Content Viewer: Browsing signs etc.
– Writer: Creating signs, editing playlists, sequences, schedules, etc.
– Approver: Approving videos in Director and publishing signs in Creator.
– Deployer: Ability to press the ‘Deploy Content’ button.
– Assigner: Ability to assign signage and other content to zones.
– Admin: Adding/removing users and changing roles and permissions.
– Locker: Ability to lock a sign in Creator (preventing others from changing certain aspects).
– Commander: Ability to use the SignStix Commander app to switch the content for particular location.
– Device Viewer: Ability to view devices in Device Admin, get diagnostics and screenshots.
– Device Manager: Ability to register new devices, change device settings, reboot devices, etc

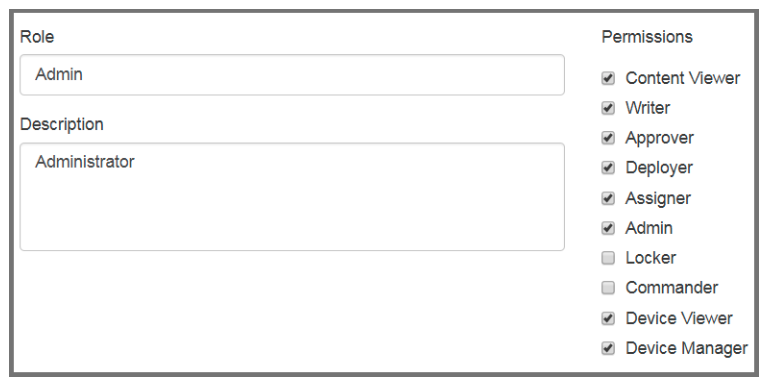
How do I change user permissions in SignStix

Changing Users’ Access Rights

By default there is only one role in a new SignStix account – ‘Full’ – which gives unrestricted access to the account. You can restrict a user’s access rights by either:

– Assigning the user a role that has different permissions (creating a new role first if necessary).
– Alter the permissions of the user’s current role (bearing in mind that this will affect all users with that role).

Editing Permissions on a Role

Log into SignStix Director:

  1. Navigate to Admin > Role Management.
  2. Click the pencil icon on the relevant role.
  3. Use the tick boxes to choose the desired set of permissions.
  4. Click the ‘Update Role’ button to confirm your changes.

Adding a New Role

  1. Navigate to Admin > Role Management
  2. Click the plus (+) button near the top.
  3. Enter a name for the role.
  4. Use the tick boxes to choose the desired set of permissions.
  5. Click the ‘Add Role’ button to confirm your changes.

Assigning a Role to a User

  1. Navigate to Admin > User Management.
  2. Click the pencil icon on the relevant user.
  3. Use the ‘Role’ drop-down menu to pick your desired role.
  4. Click the ‘Update User’ button to confirm your changes.