HOW DO I USE A WEB VIEW IN A SIGN

The Web View layer in Creator allows you to include a web page (or a web site or application) as part of a sign. As of SignStix 2.9.7, a Web View may be either:

  • Interactive
  • Non-interactive

In the interactive case, the sign is intended to be used on a touchscreen.  Users can interact directly with the web site (or application) contained in the Web View. They can scroll, follow links, enter search text etc. in a very similar way to using a web browser on a computer or tablet.  Under this model, SignStix becomes a powerful tool for managing and deploying web applications across your estate.

In the non-interactive case, the Web View is effectively a snapshot image of a particular web page.  When deployed to a SignStix Player, the snapshot is updated once every second, making it an effective way of including ‘live’ information in your signage.  Because the Web View is treated as a (special kind of) image, it can be animated in the same way as other layers such as blocks and text.

How do I use a web view in a sign

Adding a Non-Interactive Web View in Creator

  1. In Creator, click the ‘Web View Tool’ icon (a globe) in the toolbox at the top left.
  2. Drag the resulting Web View onto the sign canvas.
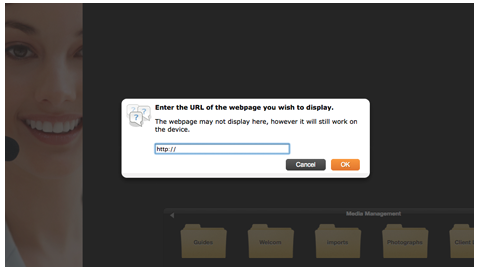
  3. Enter the URL that you would like the Web View to display then click ‘OK’.
  4. Ensure the ‘Interactive’ box is disabled.

Adding an Interactive Web View in Creator

  1. Follow the steps above but ensure the ‘Interactive’ box is enabled.
  2. Choose a URL Ruleset (see explanation below) so that users are restricted only to the pages you want them to see.

Note that to avoid confusion, only one interactive Web View is allowed per sign.

WebView Options: 

Using JavaScript

SignStix allows developers to customise and extend the SignStix user experience through the JavaScript programming language.  For example, you could write a piece of JavaScript that downloads live data from a web source, and dynamically updates a Text layer in the sign to display that data.

You can also control the Player itself from JavaScript e.g. jump to a different part of the sign, or jump to a completely different sign.  The WebView options relating to JavaScript are described below.

JavaScript API: Tick this box to allow the target webpage to interact with SignStix Player via the SignStix JavaScript API. See https://cms.signstix.com/jsapi for details.  Note, this should only be ticked for websites that you trust.

JS Extension:  Here you can specify a piece of JavaScript that will be executed immediately after the URL is loaded in the WebView.   This allows you to extend the functionality of a website with a piece of JavaScript that’s deployed with the sign, without having to host it on a web server.

If you would like the entire content of the page to be determined by the JS Extension, you can set the URL to be:  about:blank

In some situations, you may want a WebView to act purely as a controller (e.g. downloading data and updating layers in the sign) and not as a visual component.  In such cases, the WebView can be positioned off-screen in Creator.

URL Rules for Interactive Web Views

Before adding an interactive Web View to a sign, you should deal with any security considerations first.  Although there is no address bar in the Web View (so users cannot enter URLs directly), there are still some steps you should take to prevent a malicious user from displaying unwanted content on your touchscreens.

As an example, a Web View might be configured to show your own website, but if your website links to a promotional video on YouTube, say, you might inadvertently be allowing users to search for inappropriate content on YouTube.

To prevent such problems, SignStix includes the concept of a ‘URL Ruleset’.  This is a set of rules governing the pages (URLs) that can or can’t be visited within an interactive Web View.

There are two kinds of rules in a URL Ruleset:

  1. Whitelist rule
  2. Blacklist rule

A whitelist rule allows a URL if it contains a particular piece of text.

For example, to allow users to browse around the SignStix website, we might add a whitelist rule for “signstix.com”.  To make this more rigorous, we could insist that URLs begin with “http://www.signstix.com”.  This would exclude URLs for other sites that merely have “signstix.com” as part of the query string e.g. “http://dodgy.illegal.com?victim=signstix.com”.

A blacklist rule disallows a URL if it contains a particular piece of text.

For example, we might decide that we don’t want users to conduct any purchases on the web site because they would have to enter credit card details in a public environment. So a blacklist rule for “pay” could be added.

When the user clicks a link, the corresponding URL must match at least one of the whitelist rules and none of the blacklist rules in the Web View’s ruleset. For example, given the small set of rules above, these URLs would be allowed:

  • http://www.signstix.com
  • http://www.signstix.com/support/
  • http://www.signstix.com/contact-us

But these URLs would not:

  • http://dodgy.illegal.com – fails the whitelist rule
  • http://www.signstix.com/payment – fails the blacklist rule
  • http://dodgy.illegal.com/paymeloads – fails both the whitelist rule and the blacklist rule

Adding a URL Ruleset in Director

  1. Log into your SignStix account by visiting the following URL in a web browser: https://cms.signstix.com
  2. Enter your login details.
  3. Once logged in, click on ‘Modules’ in the menu at the top left then click ‘URL Ruleset’.
  4. Click the ‘Add’ button (a target icon with a green plus sign) and enter a name for your ruleset.
  5. Click the ‘Add New Rule’ button to add a new URL rule.
  6. Decide whether it will be a whitelist or a blacklist rule (please see the explanation above).
  7. In the case of a whitelist rule, select ‘Begins with’ if the text you’re about to specify must appear at the beginning of the URL.  If it’s sufficient for the text to appear anywhere in a URL, deselect this box.Note that if you select ‘Begins with’, the text you enter must begin with the full URL protocol e.g.: http://www.mycompany.com
  8. In the ‘URL’ box, enter the text that URLs must contain (in the whitelist case) or must not contain (in the blacklist case).
  9. Click ‘Add Rule’.
  10. Add as many rules as you require.
  11. Edit an existing rule by clicking on it.
  12. Delete an existing rule by clicking the red ‘minus’ sign.